
By the way, as you probably notice, I'm french and my english is not very good so sorry if I don't explain the proper way (and also my photoshop is in french.)
So, first of all, I only work in Photoshop. Time to time I make drawings on paper then scan them but all my last illustrations and designs were made with my wacom intuos and this last one with my all new Cintiq 21UX.
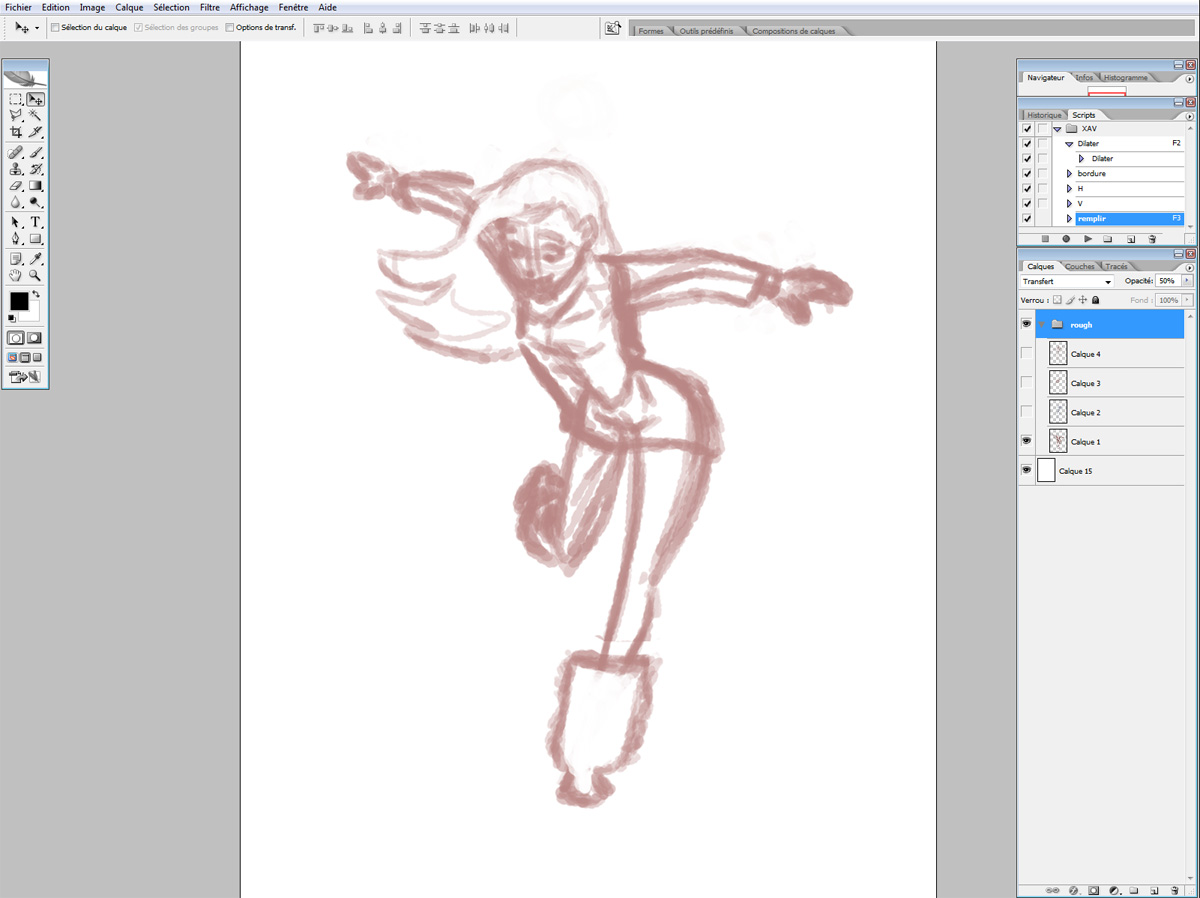
1. The drawing, with a simple home made brush, very rough.
 2. I turn over the drawing and make a cleaner drawing.
 3. I rebuild the tricky parts to be sure of the construction.
 4. I make the final drawing with a clean line and I fix some parts (here the face).
 5. I start the colors with the line above.
 6. Every part (face, jacket, hair, etc) on a separated level.
 7. The face.
 8. cheeks and nose.
 9. I add the lines and other details.
 10. With the gradient tool, I make a subtle color effect.
 11. I set the layer in screen mode and lower the opacity.
 12. I start the background with the basic color.
 13. I add the snow with a brush that looks like snow flakes.
 14. A white gradiant to suggest the snow on the floor.
 15. A quick shadow on the ground to set the character in space.
 16. A quick skyline of Paris.
 17. I add a layer of noise.
 18. I lower the opacity and set it to color burn.
 19. I had a paper texture layer that I colored in light blue before.
 20. I set it to screen and lower the opacity.
 21. I finally add my signature...
 22. And voila !
20 commentaires:
What a lovely tutorial of your process! Thank you so much for sharing! I especially loved this piece. So playful. <3
Looove the step by step breakdown.
It's nice to see you work out the drawing/construction.
Please post more sketchy, rough stuff if you can. I love seeing how an artist thinks as much as the finished piece.
Thanks!
-Oskar
Very nice,your tutorial,man!Thanks!
I love seeing process! Thanks for sharing this. Good stuff!
What a wonderful process you have here.. really informative... thank you so much for sharing.
P
Thanks for the tutorial. Always good to pick up a few tips. :)
Sympa de nous montrer ça!!
Man, thanks a lot for the great material!
You're the best!
Congratulations
Thanks! Your coloring techniques are very helpful.
Im fan of your work :) nice tuto.
lovely image, and thanks for sharing your process :D
putain, j'ai rien compris!!
tu peux la refaire s'il te plait,
et en francais bien sûr!!:)
Wonderful tutorial. Thanks for sharing!
Thanks for the tip, i even tried my self (with my little skill of course :p) !
http://1.bp.blogspot.com/_EVbgjyXfrLQ/TSOi2AughaI/AAAAAAAAAE0/OC8DXluT65U/s1600/cerf2+copy.jpg
I didn't know about the noise ! thanks for sharing :)
Thanks for poppin up yer process, really nice piece and really nice to see the progression. Cheers
really nice tutorial!
I enjoyed very much.
thnk u for post it!
Merci !! très chouette tuto.
Thank you SOOOOO much!!! :D This helps a lot! I'm curious though, which brush do you use? It looks really rough and nice, I like it!
O melhor tutorial que já vi!
belo trabalho!
Great tutorial. I love your style. :)
Enregistrer un commentaire